
Welcome
Vibe Kitmaker Design turns the sample folders you never finish sorting into drum kits that sound like you, then puts them on your MPC, sampler or DAW.
How it works
Everything in the app comes down to three moves:
What you need
| You need | Details |
|---|---|
| A computer | A Mac with Apple Silicon (M1 to M4), or a PC with Windows 10 or 11 (64-bit). |
| Your samples | Folders of drum sounds. WAV and AIFF files work everywhere in the app. |
| Somewhere to play them (optional) | An MPC, MPC 3 Desktop, another sampler or groovebox, or a DAW such as Ableton Live, FL Studio or Logic Pro. |
| A MIDI controller (optional) | Handy for auditioning kits, but your computer keyboard works too. |
| A local AI app (optional) | Ollama or LM Studio can add an AI curator. The app works fully without one. See chapter 13. |
You don't need Python, Node or any other software, and you don't need an account.
Update checks contact the official release service. Your sample audio is not sent with update checks. Scanning, sorting, processing and exporting all happen on your machine, and the app sends no usage data anywhere.
The app only reads your sample files. It never moves, renames or changes the originals, and new kits are saved as fresh copies.
Install and first launch
Installing takes a minute. The first time you open the app it asks you two things.
On a Mac
- Open the downloaded .dmg file.
- Drag Vibe Kitmaker Design into your Applications folder.
- Open it from Launchpad or Spotlight.
- If macOS says it can't verify the developer, open System Settings → Privacy & Security, scroll down and click Open Anyway. On older macOS, Control-click the app and choose Open.
On Windows
- Run the downloaded Setup .exe installer.
- If a blue SmartScreen box appears, click More info, then Run anyway.
- The app installs for your user account. You don't need administrator rights.
- Open Vibe Kitmaker Design from the Start menu.
Application updates
This guide accompanies version 3.10.0, the first release with the signed updater enabled. Install this version manually once if your older copy has no updater.
Open the Standalone Syndicate Studio Hub, choose Updates, then Check now. The app also checks shortly after launch and once a day while running. When a newer version is available, save your work and choose Install update. Confirm installation; Windows may close the app during installation. On macOS, choose Restart app after installation.
Update payloads must pass signature verification. If a check or download fails, try again later or download the current installer from the official Standalone Syndicate release page. A failed check does not mean your version is current.
These builds are not Apple-notarized or Windows publisher-signed. Operating-system warnings may appear. Updater signature verification is separate and remains enabled. Only proceed with installers obtained from the official website or Standalone Syndicate releases repository.
Question 1: the license agreement
On first launch the app shows its license agreement. Scroll to the end, tick the box to say you agree, then continue. The app is free; the agreement covers how it may be used and asks you to keep backups of your drives and cards.
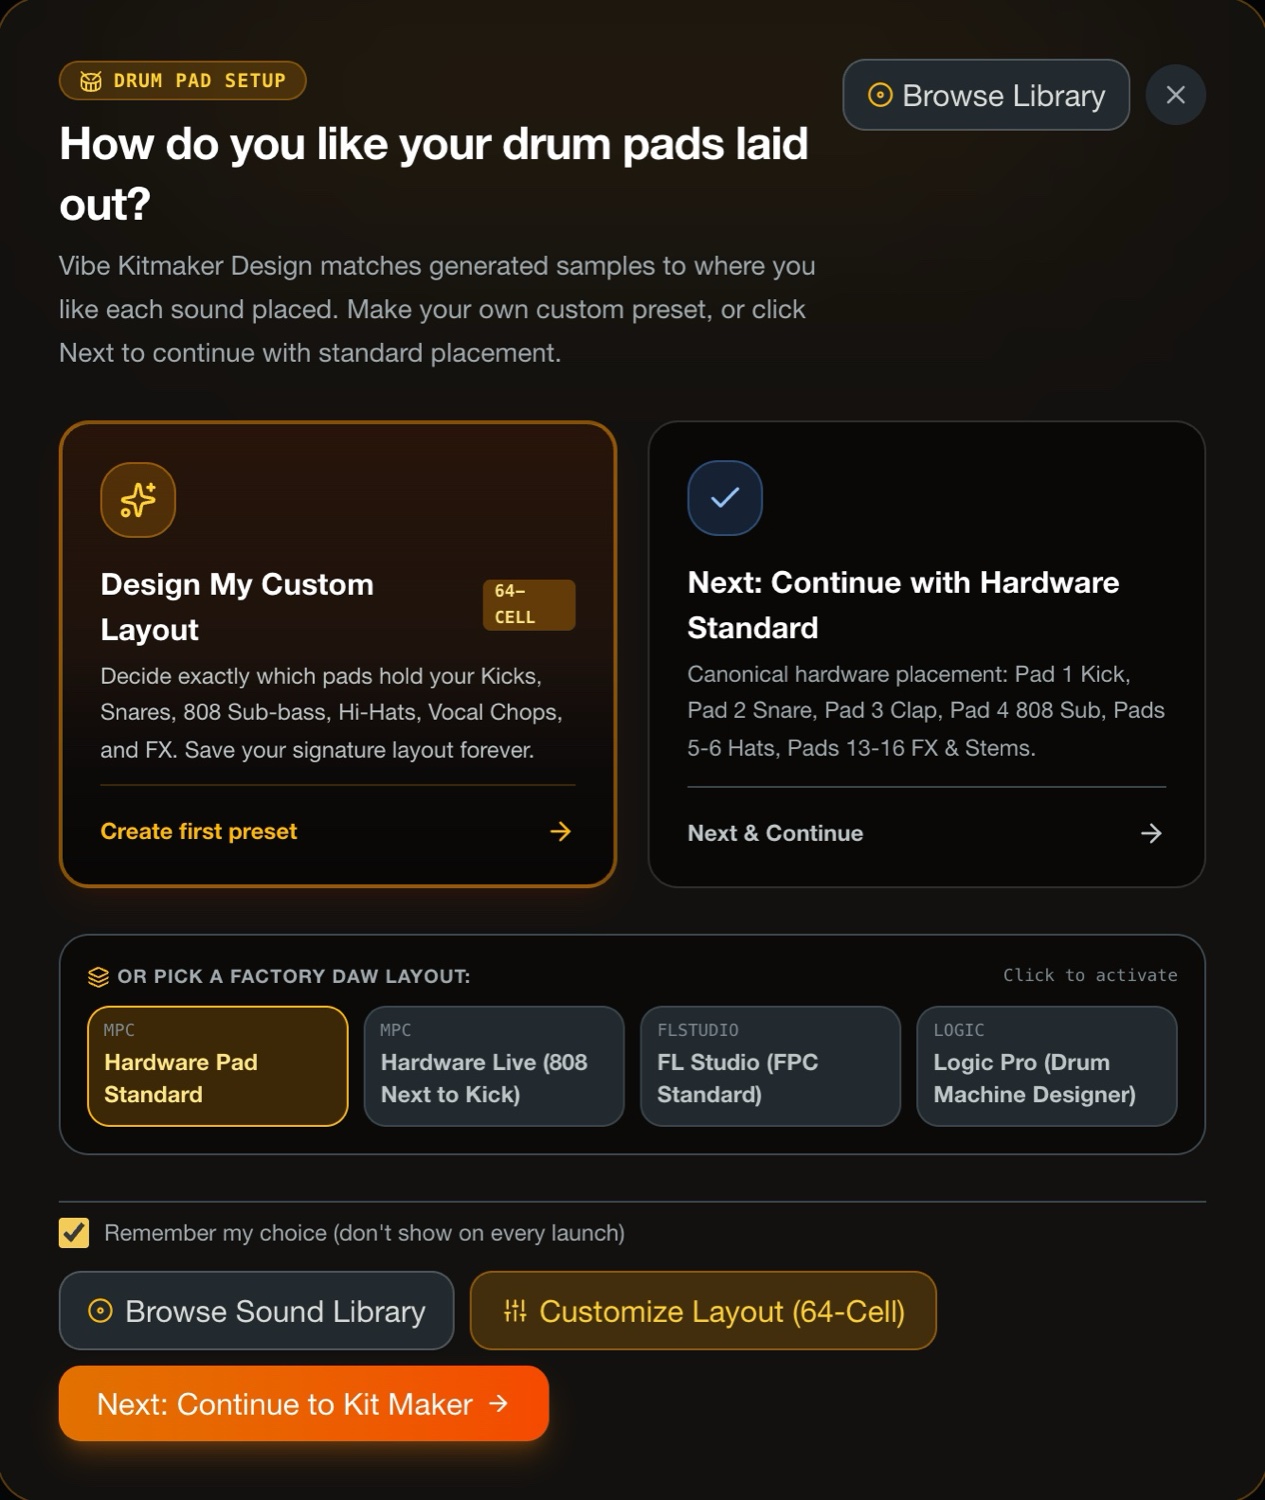
Question 2: how you like your pads laid out
The app places sounds where you expect them on your pads. Choose one:
- Next: Continue with Hardware Standard uses the usual MPC placement: kick on pad 1, snare on 2, clap on 3, 808 on 4, hats on 5 and 6, and effects on 13 to 16.
- Design My Custom Layout lets you decide exactly which pads hold kicks, snares, 808s, hats, vocal chops and effects, and saves it as your own preset.
- A factory layout matches another setup, such as an MPC with the 808 next to the kick, FL Studio's FPC or Logic Pro's Drum Machine Designer.
Tick Remember my choice so the question doesn't come back on every launch. You can change the layout any time from the Make a kit screen.
A quick tour
The sidebar on the left takes you everywhere. The top of each page holds two bars you will use a lot.
| Make a kit | Build a kit step by step, with as much or as little direction as you like. (Ch. 5) |
| Sound library | Add your sample folders and see what the app knows about them. (Ch. 4) |
| Quick build | Pick a genre and a kick, and get a finished kit fast. (Ch. 6) |
| Polish samples | Clean up and add punch to individual sounds. (Ch. 8) |
| Inspect a sound | See the details of any single sample. (Ch. 9) |
| Kit formats | Prepare a kit for other gear and software. (Ch. 10) |
| Package a collection | Turn existing folders of kits into MPC expansions. (Ch. 11) |
| Studio settings | At the bottom of the sidebar: connect optional AI and more. (Ch. 13) |
The kit destination bar

Choose where your kits are going before you build them: MPC Standalone, another sampler, a DAW or a mobile app. The note on the right tells you what you will get, such as an XTD + XPM expansion for MPC. Your choice is remembered, even after you restart the app.
Other controls at the top
| Hardware MIDI bar | Below the destination bar. Play kits from a MIDI controller or your computer keyboard. (Ch. 7) |
| Standalone Syndicate menu | In the middle of the very top bar. Opens the studio hub. |
| AI status pill | Top right. Shows whether a local AI app is connected; click it to open Studio settings. |
Add your sounds
Tell the app where your samples live once. It scans them, sorts them, and remembers everything for every kit you make after that.
Add a sample folder
- Click Sound library in the sidebar.
- Under Add Sound Folder, click Browse and choose a folder, or type its full path and press Enter.
- Wait for the scan to finish. The app looks through every subfolder and listens to each sound.
- Repeat for any other folders or drives. Each one appears under Registered Paths.
The first scan of a big collection can take a while. After that, the app remembers what it has already analyzed, so later scans only look at new or changed files.
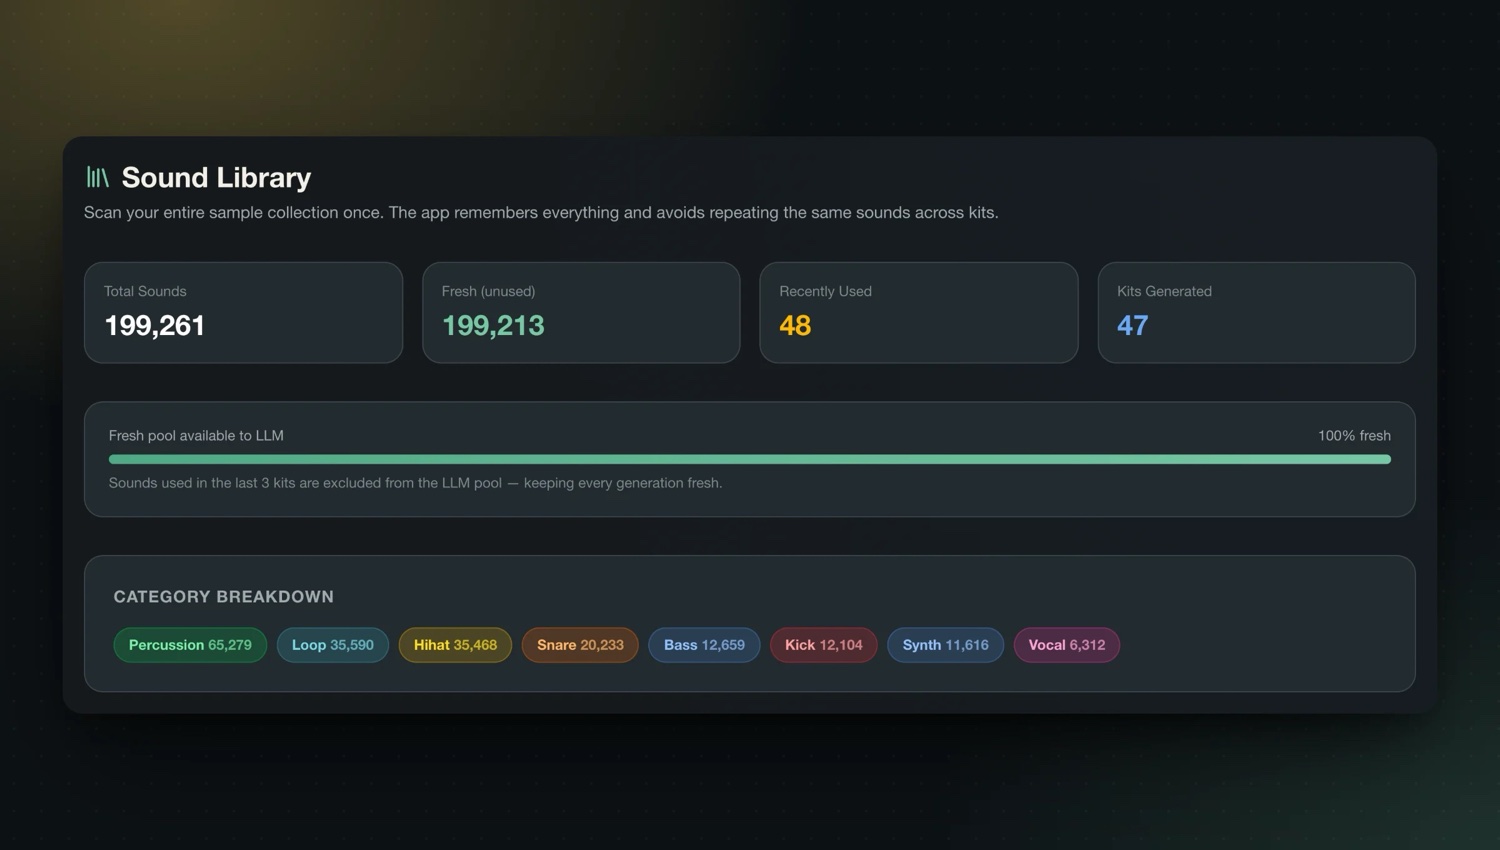
What the numbers mean
| Total Sounds | Every sound the app has found in your folders. |
| Fresh (unused) | Sounds that weren't used in your last three kits. New kits draw from these first. |
| Recently Used | Sounds from your last three kits. The app holds them back so new kits don't repeat the last ones. |
| Kits Generated | How many kits you have made. |
| Category Breakdown | How many kicks, snares, hats, 808s, percussion, loops, synths and vocals you have. |
The app sorts sounds by how they sound, not only by their file names. A file called slice_6.wav still lands in the right category.
Keeping your library tidy
| Rescan All | Checks every registered folder again for new, changed or deleted files. |
| Clear Usage History | Makes every sound "fresh" again. Use it when kits start to feel samey. It doesn't delete any sounds. |
| AI Re-Catalog | Listens again to sounds with unhelpful names and fixes their categories. It runs in the background with a progress bar and a Stop button, so you can keep working. |
| Duplicates & Re-Vibe | Finds sounds that are near-identical copies of each other. |
| Recent Kits | Lists the kits you made most recently. |
Reset & Clear wipes the app's whole library memory: sounds, folders, history and ratings. Your audio files stay where they are, but you will need to add and scan your folders again.
Make a kit
The guided way to build a kit. Give the app a little direction, or none at all, and it finds drums that belong together.
01: Where are you starting?
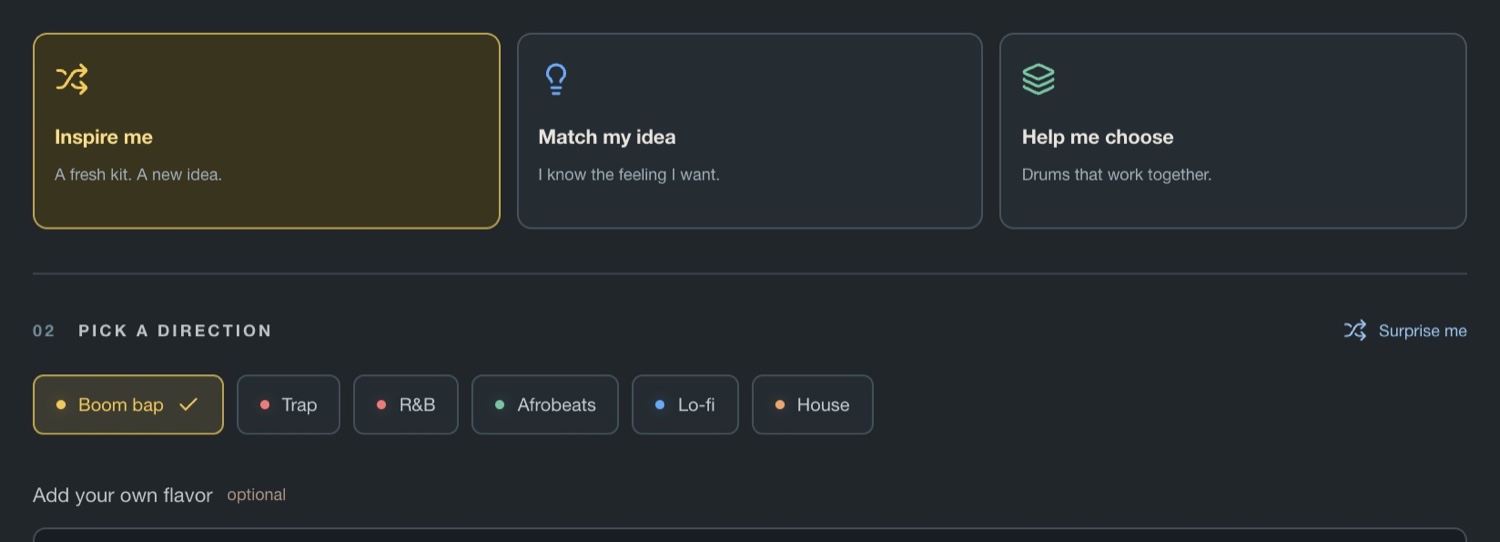
| Inspire me | A fresh kit and a new idea. Good when you just want to start making music. |
| Match my idea | You know the feeling you want. Describe it and the app goes after it. |
| Help me choose | The app focuses on drums that work well together. |
02: Pick a direction
Choose a style: Boom bap, Trap, R&B, Afrobeats, Lo-fi or House. Click Surprise me to let the app pick. The card on the right describes the sound of the style you chose.
Under Add your own flavor you can describe what you hear in your head, in your own words: "dusty, punchy, a little weird" or "dark drill with distorted 808s". The more specific you are, the better the match.
03: Your pad layout
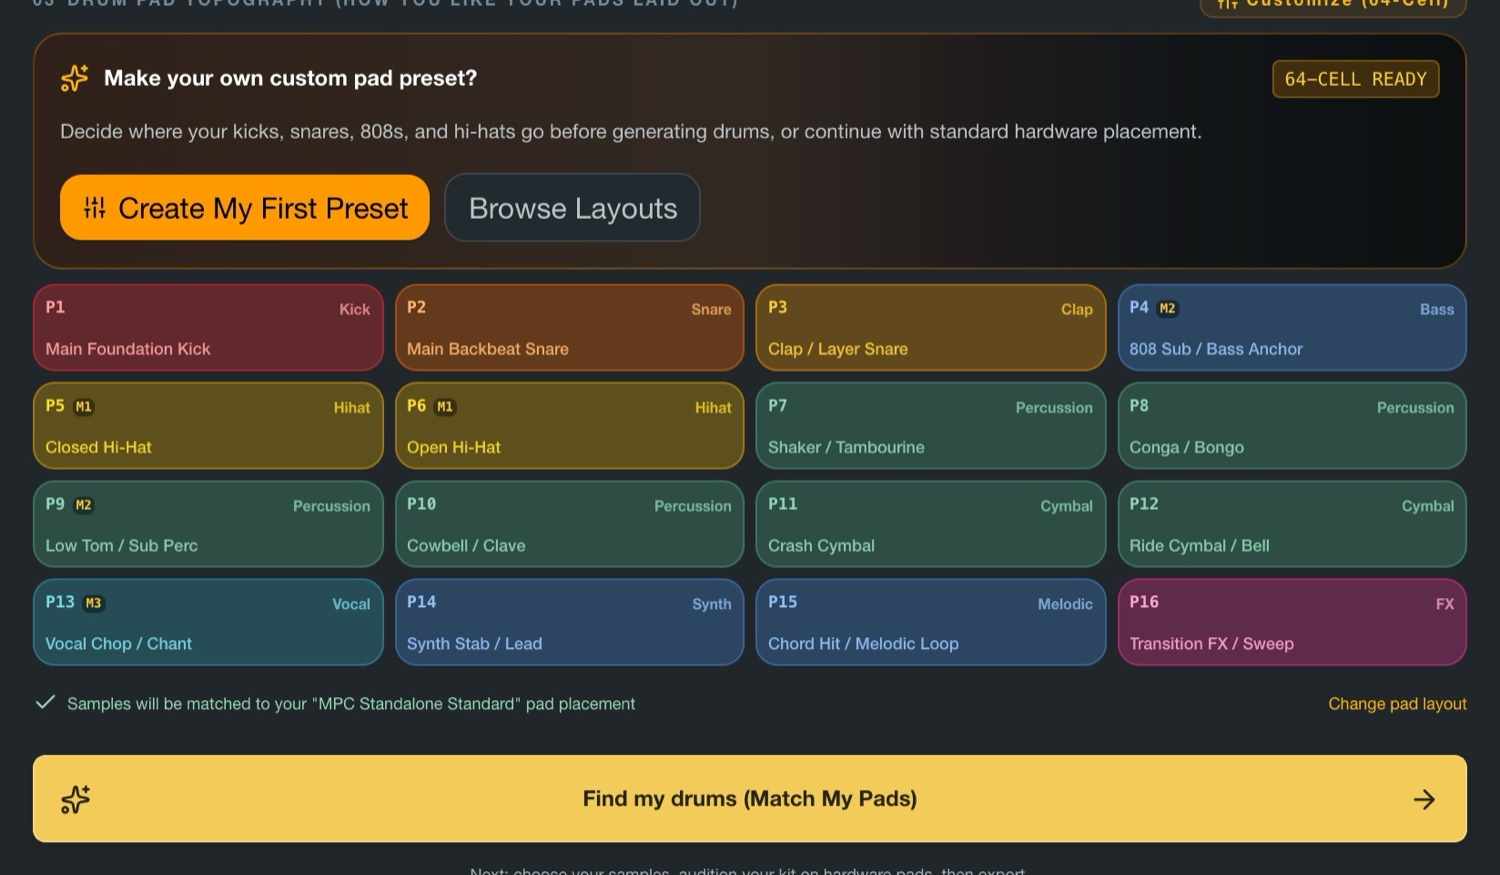
This section shows which kind of sound will land on each of the 16 pads. Keep the standard layout, click Browse Layouts to pick another one, or click Create My First Preset to design your own. Customize (64-Cell) also covers all four corners of every pad for MPCe-style kits.
When you're ready, click Find my drums (Match My Pads).
Review your kit
- Listen: click any pad, or play it from your keyboard or controller (chapter 7).
- Keep what you love: give a sound a thumbs up. The app learns your taste and favors similar sounds in future kits.
- Replace what you don't: use Swap Sound or the thumbs down. The app swaps in another sound of the same type and avoids the rejected one next time. Swapping is safe, so try as many as you like.
- Start again: Re-roll Kit picks a whole new set with the same settings. Start Over takes you back to the beginning.
Save it
- Export it to the destination you chose in the kit destination bar (chapter 10).
- Download Kit saves a copy to your Downloads folder.
- Upload to MPC Live 3 Pads copies it straight to a connected MPC or SD card (chapter 12).
- Create Another Kit starts the next one.
Rate sounds as you go. A few thumbs up and down teach the app your taste faster than anything else.
Quick build
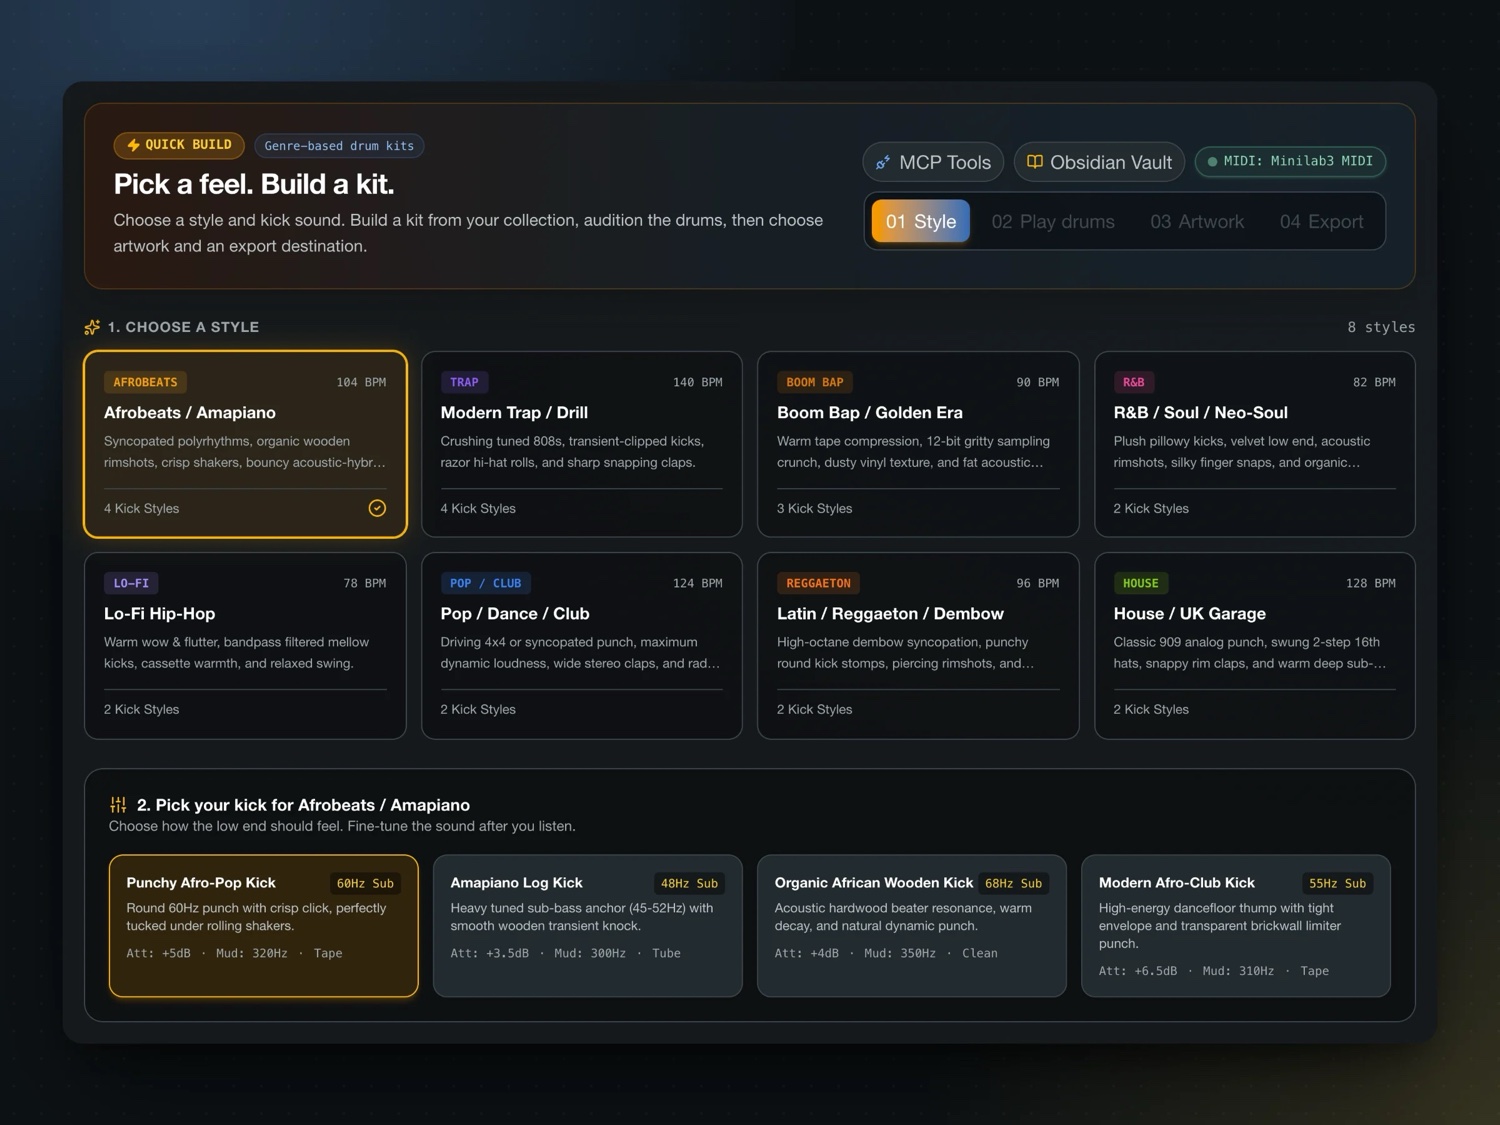
Pick a feel, build a kit. Four steps take you from a genre to a finished expansion: Style, Play drums, Artwork and Export.
Step 1: Style
- Choose a style. Pick one of eight: Afrobeats / Amapiano, Modern Trap / Drill, Boom Bap / Golden Era, R&B / Soul / Neo-Soul, Lo-Fi Hip-Hop, Pop / Dance / Club, Latin / Reggaeton / Dembow or House / UK Garage. Each card shows its usual tempo.
- Pick your kick. Choose how the low end should feel. Each kick style shows its sub frequency and character, and you can fine-tune the sound after you listen.
- Set up the kit (see the next section), then click Build my kit.
Kit setup options
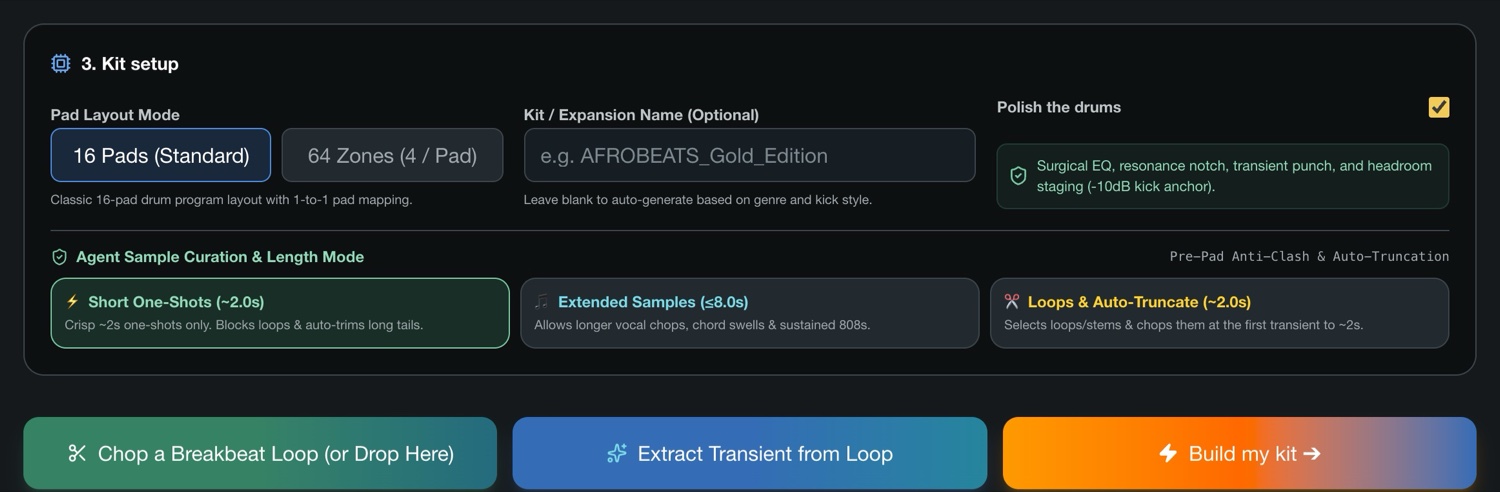
| Pad layout mode | 16 Pads (Standard) puts one sound on each pad. 64 Zones (4 / Pad) puts four sounds on every pad, one per corner, for MPC 3.10's quadrant pads. |
| Kit / expansion name | Optional. Leave it blank and the app names the kit for you. |
| Polish the drums | Gives every drum its own mix pass: kicks lose mud and gain punch, 808s stay tight, and snares and hats gain clarity. Leave it on unless you want raw sounds. |
| Sample length | Short One-Shots (about 2 seconds) for classic drum hits, Extended Samples (up to 8 seconds) for long 808s and vocal chops, or Loops & Auto-Truncate to trim loops at their first hit. |
Below the setup you'll also find Chop a Breakbeat Loop and Extract Transient from Loop, for pulling drum hits out of a loop you drop in.
Steps 2 to 4
| 02 Play drums | Audition every pad, swap any sound you don't like, or re-roll the whole kit. |
| 03 Artwork | Give the expansion a cover: your own photo (you choose the square crop), an image from a local Stable Diffusion or ComfyUI install, or the built-in procedural artwork. |
| 04 Export | Send it to your MPC's SD card or USB drive, install it in MPC 3 Desktop, or save it to any folder (chapter 12). |
Play your kit
Hear a kit the way you'll use it: by playing it. Use a MIDI controller or your computer keyboard.
With a MIDI controller
- Plug in your controller, or connect your MPC in controller mode.
- Choose it in the Hardware MIDI menu. If it isn't listed, click the refresh button next to the menu.
- Choose how your controller's notes map to pads:
- Pads A/B (36–51): the usual drum pad notes on most controllers.
- Chromatic Keys: play pads from a piano keyboard, one key per pad.
- GM Drums: the General MIDI drum map used by many keyboards and DAWs.
- Strike a pad. The box on the right shows what you just played.
The status chips under the menu show which devices are online.
With your computer keyboard
Turn on Keys (ZXCV) to play pads from your computer keyboard. It's handy when you don't have a controller nearby.
Full Level
Full Level (127) works like Full Level on an MPC: every hit plays at maximum velocity, however softly you strike. Turn it off to hear your playing dynamics.
Kits built for 64 zones respond to where you hit each pad. Use an MPC with quadrant pads, or the on-screen pads, to hear all four sounds.
Polish samples
A workspace for making one sound hit harder: remove mud, add punch and give it some color, without a chain of plug-ins.
Polish a sound
- Click Polish samples in the sidebar.
- Drag audio files onto Sample Source, or click Choose Audio File(s). You can add one file, several, or a whole folder.
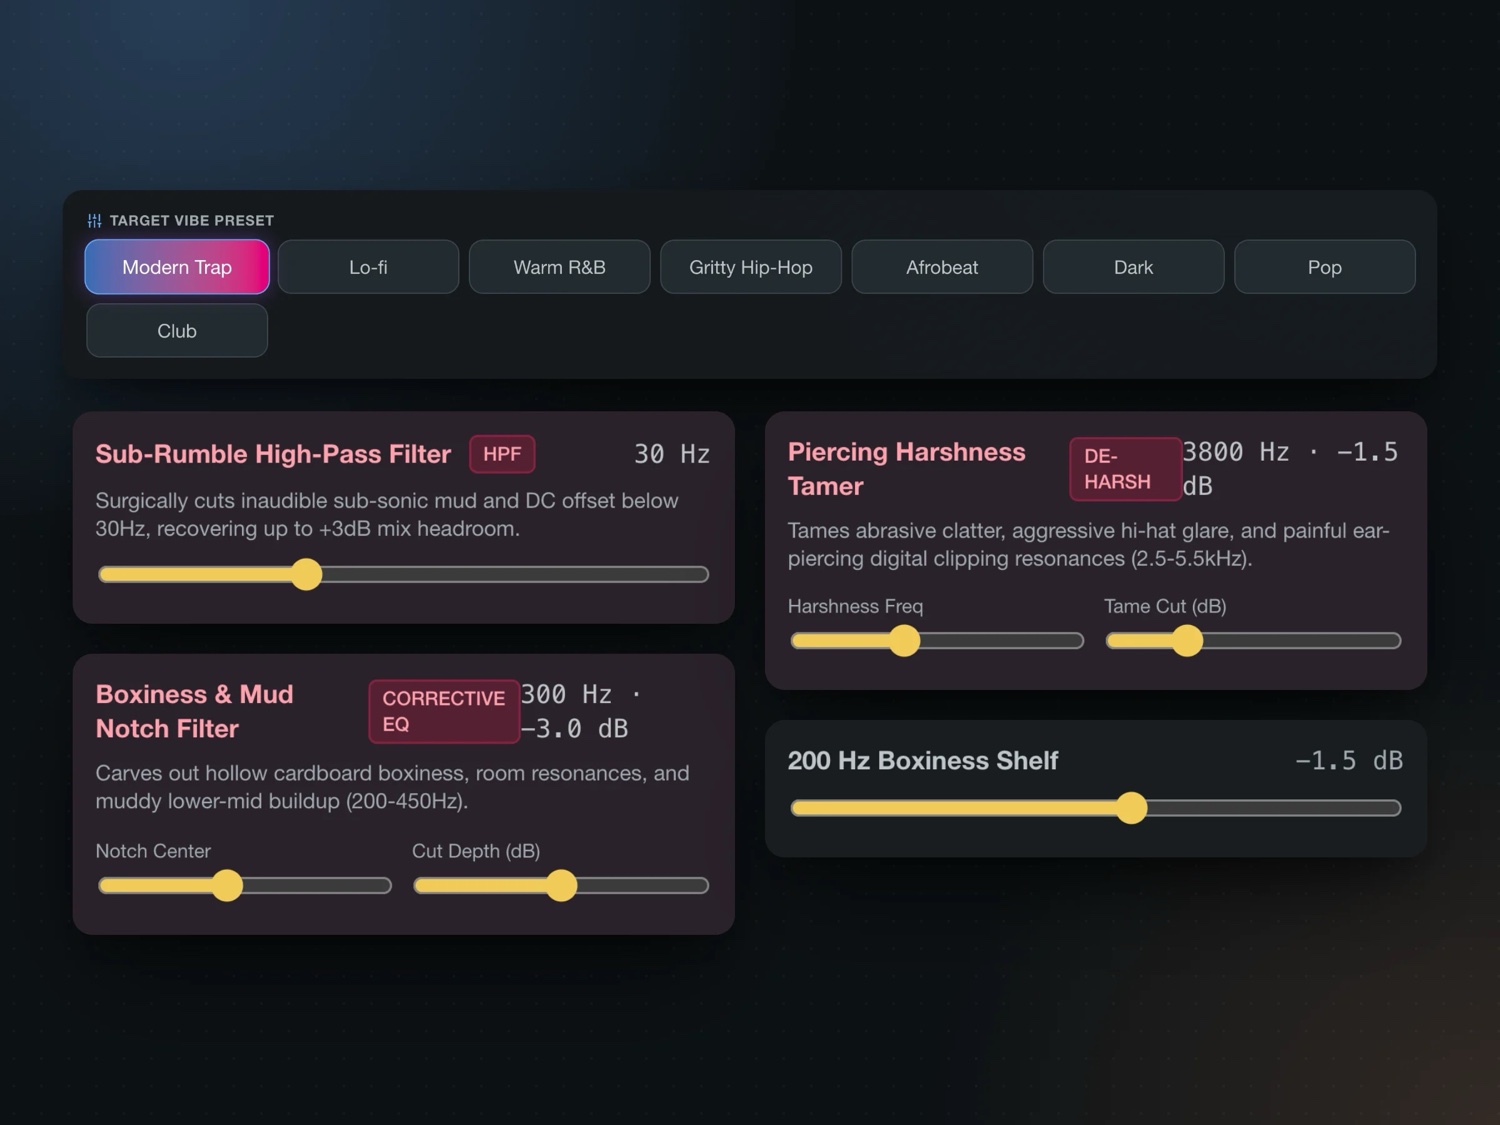
- Pick a Target Vibe Preset: Modern Trap, Lo-fi, Warm R&B, Gritty Hip-Hop, Afrobeat, Dark, Pop or Club.
- Under Applied DSP Parameters, choose Fix & Clean (remove problems), Sweeten & Punch (add character) or All, and adjust any module's sliders.
- Compare the before and after, then send the result on.
What you'll see
| Spectrum Energy | Eight frequency bands, from Sub to Ultra, before and after processing, so you can see what changed. |
| Delivery Readout | Peak level, true peak, loudness and leftover resonance. |
| Processing modules | Each module explains what it fixes in plain words: sub-rumble filter, mono sub guard, mud notch, harshness tamer and more. |
| Smart File Naming | Renames files as they're saved, using a pattern such as {author}_{kit}_{instrument}_{n}. A live preview shows the result. |
Where it goes next
- Send to Kit Maker drops the polished sounds into the kit you're building.
- Send to Expansion Builder passes them to Package a collection (chapter 11).
- 1-Click to MPC 3 sends them straight to MPC 3 Desktop.
The before-and-after comparison is loudness-matched, so a louder version can't fool you into thinking it's better.
Inspect a sound
Look inside any single sample before you commit it to a kit.
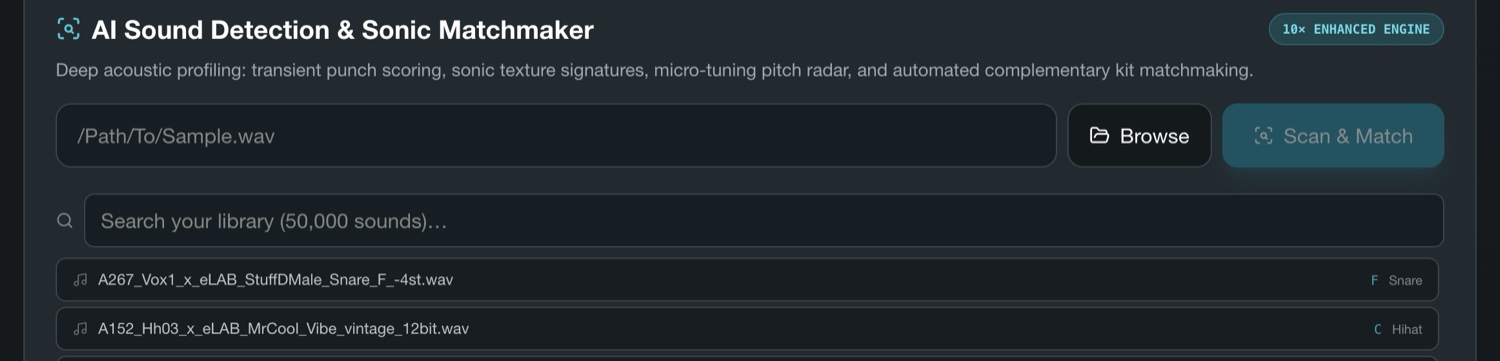
- Click Inspect a sound in the sidebar.
- Click Browse to choose a file, paste its path, or search your library and click a sound in the list.
- Click Scan & Match.
What the report shows
| Waveform | A picture of the sound's shape over time. |
| Format | Length, sample rate, bit depth, channels and file size. |
| Levels & envelope | Peak and average loudness, how fast it hits (attack), how long it rings (decay), and a punch score, with plain-English hints such as "very snappy" or "long tail". |
| Frequency balance | How the energy splits from sub-bass to air, so you can spot a boomy, boxy or bright sound at a glance. |
| Pitch & tempo | The detected note and tempo, plus how tonal or noisy the sound is and how wide it is in stereo. |
| Category | How the app classifies the sound, so you know where it will land in a kit. |
The scanner also suggests other sounds from your library that would pair well with this one.
Kit formats
One kit, more places to play. Build or open a kit and prepare it for 16 kinds of hardware, DAWs and mobile apps.
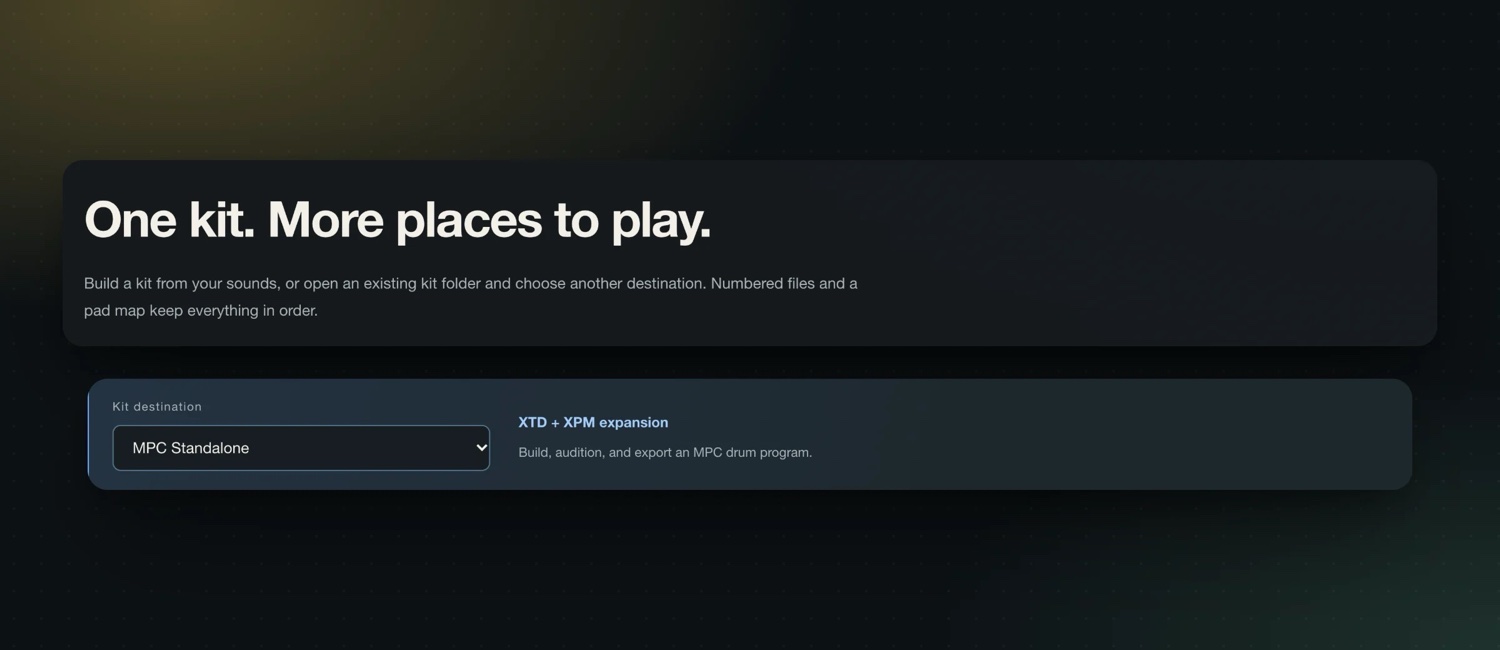
Prepare a kit
- Choose a destination in the kit destination bar at the top of the page.
- Click Kit formats in the sidebar and give the kit a name.
- Click Add sounds to pick WAV or AIFF files, or Open kit folder to load a kit you made before. Drag the sounds into the order you want.
- Choose an output folder and click Export.
What you get
| Destination | What the app makes |
|---|---|
| MPC Standalone | A finished MPC drum program and expansion (XTD + XPM), ready to load. |
| MPC Sample, Ableton Move, OP-XY, Synthstrom Deluge | A folder of numbered WAV files to copy onto the device. |
| Teenage Engineering OP-1 | Mono AIFF files to arrange in teenage engineering's Drum Utility. The whole kit must fit in 12 seconds. |
| Ableton Live, FL Studio, Logic Pro, Bitwig, Studio One, Serato Studio | Numbered WAV files to drop onto a drum rack or pad instrument. |
| Roland Zenbeats, Ableton Note, Koala Sampler, BeatMaker 3 | Numbered WAV files to import on your phone or tablet. |
For everything except MPC, the app prepares the sounds and you save the final kit on the device or in the software. Every package includes an IMPORT.txt with the exact steps for that destination, a pad-map.csv showing which sound goes where, and a kit.json the app can reopen later.
Good to know
- Sounds are exported as 44.1 kHz, 16-bit audio. Convert MP3 and other formats to WAV first.
- Kits can hold up to 128 sounds. Direct MPC export takes 1 to 16 sounds; use Quick build or Make a kit for 64-zone MPC kits.
- OP-XY sounds can be up to 20 seconds each; other destinations allow up to 2 minutes per sound.
- The app never overwrites an existing kit. Each export goes to a fresh folder.
Package a collection
Already have folders full of kits? The Expansion Builder turns them into proper MPC expansions in one batch.
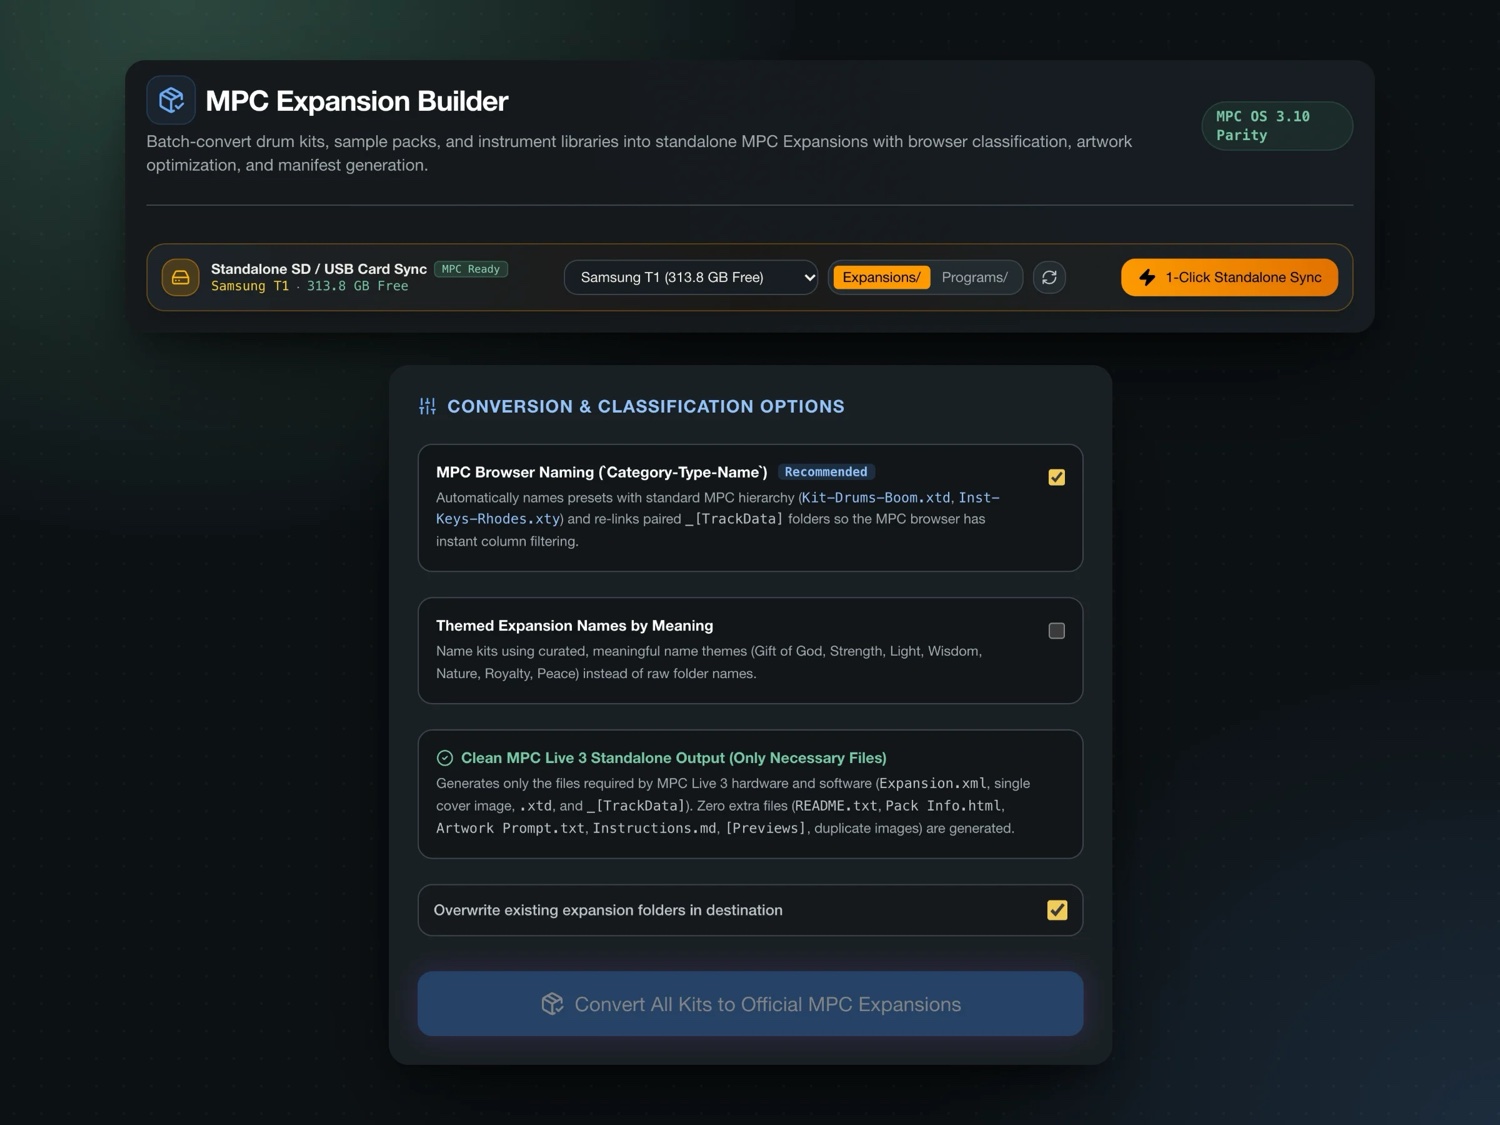
Convert existing folders
- Click Package a collection and stay on Convert Existing Folders.
- Under Source & Destination, choose the folder that holds your kits, and where the expansions should go.
- Optionally set the Expansion Manufacturer / Vendor name that appears in the MPC browser.
- Pick a cover under Package Artwork & Cover Design: your own image, an image generated from a prompt, or procedural artwork.
- Choose your options (below), then click Convert All Kits to Official MPC Expansions.
Options
| MPC Browser Naming | Names presets the way the MPC browser expects, for example Kit-Drums-Boom.xtd, so you can filter by column. Recommended. |
| Themed Expansion Names by Meaning | Gives kits meaningful names from themes such as strength, light, wisdom or nature, instead of raw folder names. |
| Clean MPC Live 3 Standalone Output | Writes only the files the MPC needs, without extra documents. |
| Overwrite existing expansion folders | Replaces expansions with the same name in the destination. Turn it off to keep older versions. |
Multi-Kit Batch Producer, the second tab, builds 4, 8 or 16 new kits in one go.
Sync straight to a card
The Standalone SD / USB Card Sync bar at the top finds connected drives. Pick your card, choose the Expansions/ or Programs/ folder, and click 1-Click Standalone Sync.
Get it onto your MPC
Three ways to get a kit onto your MPC: an SD card or USB drive, MPC 3 Desktop, or any folder you choose.
Back up your SD card or drive first. Copying files to any storage device carries some risk, and the license agreement asks you to keep backups.
SD card or USB drive
- Make sure the card or drive is formatted as FAT32 or exFAT and has at least 1 GB free.
- Connect it to your computer. To use your MPC's own storage, connect the MPC by USB and put it in controller mode so its drive appears on your computer.
- Choose your MPC drive as the export destination, or use 1-Click Standalone Sync. Kits are copied into the
Expansionsfolder. - Eject the drive safely, then open the browser on your MPC and look in Expansions.
MPC 3 Desktop
Choose MPC 3 Desktop as the export target. The expansion installs into Music / MPC Expansions and MPC 3 opens with the new kit ready in its browser.
Studio settings and optional AI
The app builds great kits on its own. If you already run a local AI app, you can connect it for an extra layer of curation.
How kit building works
| Tier 1: DSP Matchmaker | Always on. It listens to pitch, punch, attack, decay and tone to put together a kit where everything fits. No AI needed. |
| Tier 2: AI Curator | Only when a local AI app is connected. It chooses the overall feel from Tier 1's best candidates, names the kit and sets expressive pad behavior. |
Connect a local AI app
- Install Ollama or LM Studio on your computer, load a model, and start it.
- In the app, click Studio settings, or click the AI status pill at the top right.
- Click Ollama (11434) or LM Studio (1234). The address fills in for you; only change it if you run the AI app on a different port.
- Click Test. When it connects, choose your model under Select Model.
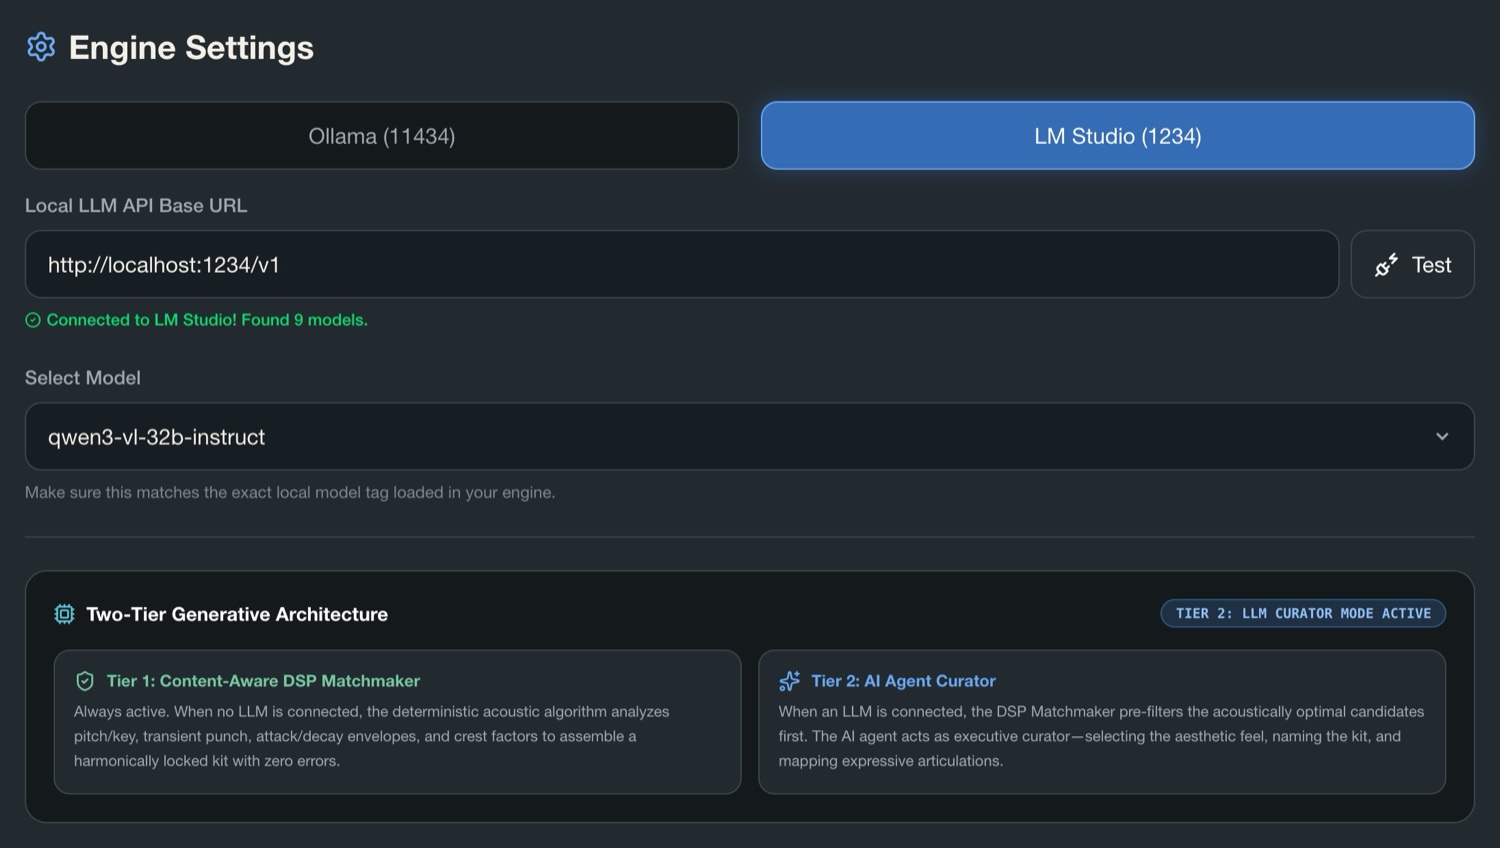
Larger models usually make better choices. The AI runs entirely on your computer, so nothing is sent online.
Groove Vault
Further down in Studio settings, Secret Groove Vault lets you upload your own 4-bar or 8-bar MIDI drum patterns (.mid), so you can hear every kit play your signature grooves.
Troubleshooting, glossary and help
Quick fixes for common snags, the terms used in this guide, and how to reach us.
Troubleshooting
| If this happens | Try this |
|---|---|
| macOS won't open the app | System Settings → Privacy & Security → Open Anyway. On older macOS, Control-click the app and choose Open. |
| Windows shows a SmartScreen warning | Click More info, then Run anyway. |
| "No audio samples found" | Add a sample folder in Sound library (chapter 4) and wait for the scan to finish. |
| Kits start to sound the same | Click Clear Usage History in Sound library, or add more sample folders. |
| Sounds are in the wrong category | Run AI Re-Catalog in Sound library, or give the files clearer names and click Rescan All. |
| My MPC or SD card isn't detected | Check the cable, put the MPC in controller mode, make sure the card is FAT32 or exFAT, then select the mounted drive in the export destination controls. |
| A file won't import | Convert it to WAV (or 16-bit AIFF) and try again. |
| A sound is too long for OP-1 or OP-XY | Trim it. OP-1 kits must fit in 12 seconds; OP-XY sounds can be up to 20 seconds. |
| The AI won't connect | Make sure Ollama or LM Studio is running with a model loaded, then click Test. The app keeps working without AI. |
| My controller isn't listed | Plug it in before opening the app, or click the refresh button next to the Hardware MIDI menu. |
Glossary
| Kit | A set of sounds laid out on pads, usually 16. |
| Expansion | An MPC package with kits, sounds and cover art that shows up in the MPC browser. |
| XTD / XPM | The MPC's drum program files. The app writes both. |
| One-shot | A single drum hit, as opposed to a loop. |
| 64 zones / quadrants | MPC 3.10 can play a different sound from each corner of a pad: four sounds per pad, 64 in total. |
| MPCe | The 3D pads on MPC Live III and MPC XL that respond to where you strike. |
| Keygroup | An MPC instrument that plays one sound across the keyboard at different pitches, such as a tuned 808. |
| Fresh pool | The sounds you haven't used in your last three kits. |
| Full Level | Plays every hit at maximum velocity. |
Help and support
Questions, ideas or a bug to report? Email support@standalonesyndicate.com or visit standalonesyndicate.com.
Vibe Kitmaker Design is freeware from Standalone Syndicate, provided under its End User License Agreement. MPC and Akai Professional are trademarks of inMusic Brands, Inc. Standalone Syndicate is independent and not affiliated with or endorsed by inMusic. Other product names belong to their owners.